How to Create New Conversion Events in Google Analytics 4

The introduction of Google Analytics 4 last year brought about a number of changes. One of which is the shift from Goals to Conversions. If you utilize GA goals, then you understand the importance of tracking activities that can lead to your business’ success. Today I’ll be teaching you how to optimize your Google Analytics 4 Conversions.
The Difference Between GA Events Vs. Goals
First, you should understand the difference between Google Analytics events and goals. For one, goals were used to track actions that could affect your business. This could refer to subscriptions to newsletters or contact form submissions. On the other hand, events were used to track other actions that did not necessarily lead to your success. This could refer to online form downloads or button clicks.
With Google Analytics 4, goals no longer exist. They are now called conversions and they require events to be set up.
Set Up Events
The first step to optimizing your Google Analytics 4 Conversions is to set up your events. Think about what your goals are and choose the appropriate event to set up. You can take a look through Google’s automatic and recommended events to get an idea of what to choose.
Then head to GA4 and click on the Events category. You will notice that there are already some automatic events such as “page_view” and “first_visit”. If you want to make your own, click “Create event”.
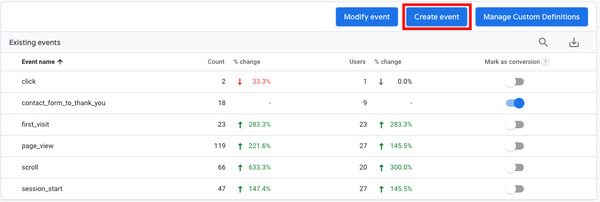
This pop up should appear, which will show you a list of your custom events. In this case, I’ve already created an event called “contact_form_to_thank_you”. To create your own, click Create.

Once you’ve done that, it will take you to a Configuration page where you will have to fill up your conditions. Here’s the configuration of the event I previously mentioned.
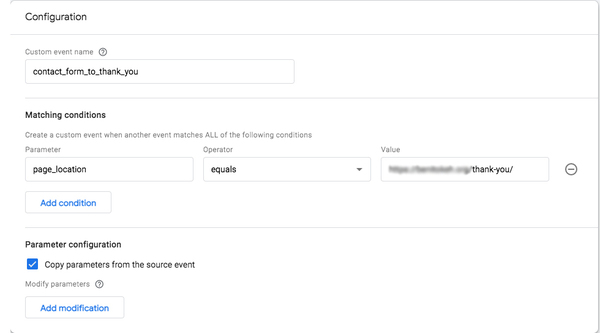
I set the parameter as “page_location”, the operator as “equals”, and the value as the URL of the site’s thank you page. I chose to copy the parameters from the source event and then hit “Create” on the upper right side of the screen.
Now I can track how many people are filling out the contact form. How? I set my contact form up so that after someone has sent in an inquiry, they will automatically be redirected to the Thank You page. And that’s basically it.
Now that you’ve created your event, let’s talk about how to turn it into a conversion.
Turn Events Into Conversions
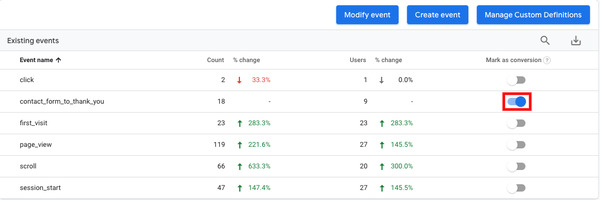
There are two ways to turn events into conversions. One is through the Events category and the other is through the Conversions category.
For the events category, all you need to do to mark it as a conversion is to click the button and you’re done.
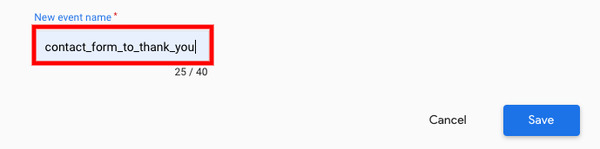
For the Conversions category, click “New conversion event”.

Then, put in your event name and hit save.
Once you’ve done this, wait a few days before testing it out. Then you should start seeing results.
Key Takeaway
Now you know how to optimize your Google Analytics 4 Conversions. Use this knowledge to track movements on your website that can help lead to its success. Make sure you set up the right events to turn into conversions to see how your website is faring. Keep a close eye on these goals to be able to develop strategies on how you can improve your site’s engagements.
If you have any other strategies for GA4 conversions, I would love to hear about them in the comments section below.